Have you ever wanted to learn how to draw a rose easy but didn’t know where to start? Well, you’re not alone. Drawing roses can seem intimidating at first, but with the right guidance, anyone can create beautiful rose sketches. In this article, we’ll break it down step by step so even complete beginners can follow along. So grab your pencil, paper, and let’s get started!
There’s something magical about roses. They symbolize love, beauty, and passion, making them one of the most popular subjects in art. Whether you’re an aspiring artist or just looking for a fun activity, learning how to draw a rose easy is a great way to express yourself creatively. Plus, mastering this skill can open doors to more advanced drawing techniques.
Don’t worry if you think you’re not “good” at drawing yet. The beauty of art lies in its imperfections. Every stroke you make brings you closer to creating something unique. By the end of this guide, you’ll have a stunning rose drawing to call your own. Let’s dive in!
Read also:Shilo Sanders Injury The Story Behind The Spotlight
Why Learn How to Draw a Rose Easy?
Drawing roses isn’t just about creating a pretty picture. It’s about understanding shapes, textures, and proportions. Roses are complex flowers with intricate petals, but breaking them down into simple forms makes the process much easier. Here’s why learning how to draw a rose easy is worth your time:
- Improves your artistic skills: Practicing rose drawings helps develop hand-eye coordination and enhances your ability to observe details.
- Boosts confidence: Once you see how quickly you can create a beautiful rose, you’ll feel encouraged to try other subjects.
- Expresses emotions: Roses are timeless symbols of love and beauty, making them perfect for gifting or personal projects.
Think about it – who wouldn’t love receiving a handmade card with a beautifully drawn rose? Or maybe you want to decorate your room with your own artwork. The possibilities are endless!
Basic Materials You’ll Need
Before we jump into the actual drawing process, let’s talk about the tools you’ll need. You don’t have to spend a fortune on expensive supplies. Here’s a simple list of materials to get you started:
Tools for Easy Rose Drawing
- Pencil (HB or 2B works great)
- Eraser (a kneaded eraser is ideal for precision)
- Sketchbook or plain paper
- Pen or fine liner (optional, for outlining)
- Colored pencils or markers (if you want to add color)
See? Nothing too fancy. The key is to focus on the technique rather than the tools. As you progress, you can experiment with different mediums like watercolors or charcoal, but for now, keep it simple.
Understanding the Structure of a Rose
Before we start drawing, it’s important to understand the anatomy of a rose. This will help you create more realistic and proportional sketches. A rose consists of several key parts:
- Petals: These are the most prominent feature of a rose. They’re layered and overlap each other, creating a beautiful spiral effect.
- Stem: The stem is usually long and thin, with small thorns running along its length.
- Leaves: Rose leaves are typically arranged in groups of three or five and have a serrated edge.
- Bud: If you’re drawing a closed rose, the bud will be tightly packed with petals.
Take a moment to study a real rose or find reference images online. Notice how the petals curl and fold, giving the flower its natural elegance. Understanding these details will make your drawing look more authentic.
Read also:Unleash Your Inner Pirate The Ultimate Guide To One Piece Gifts
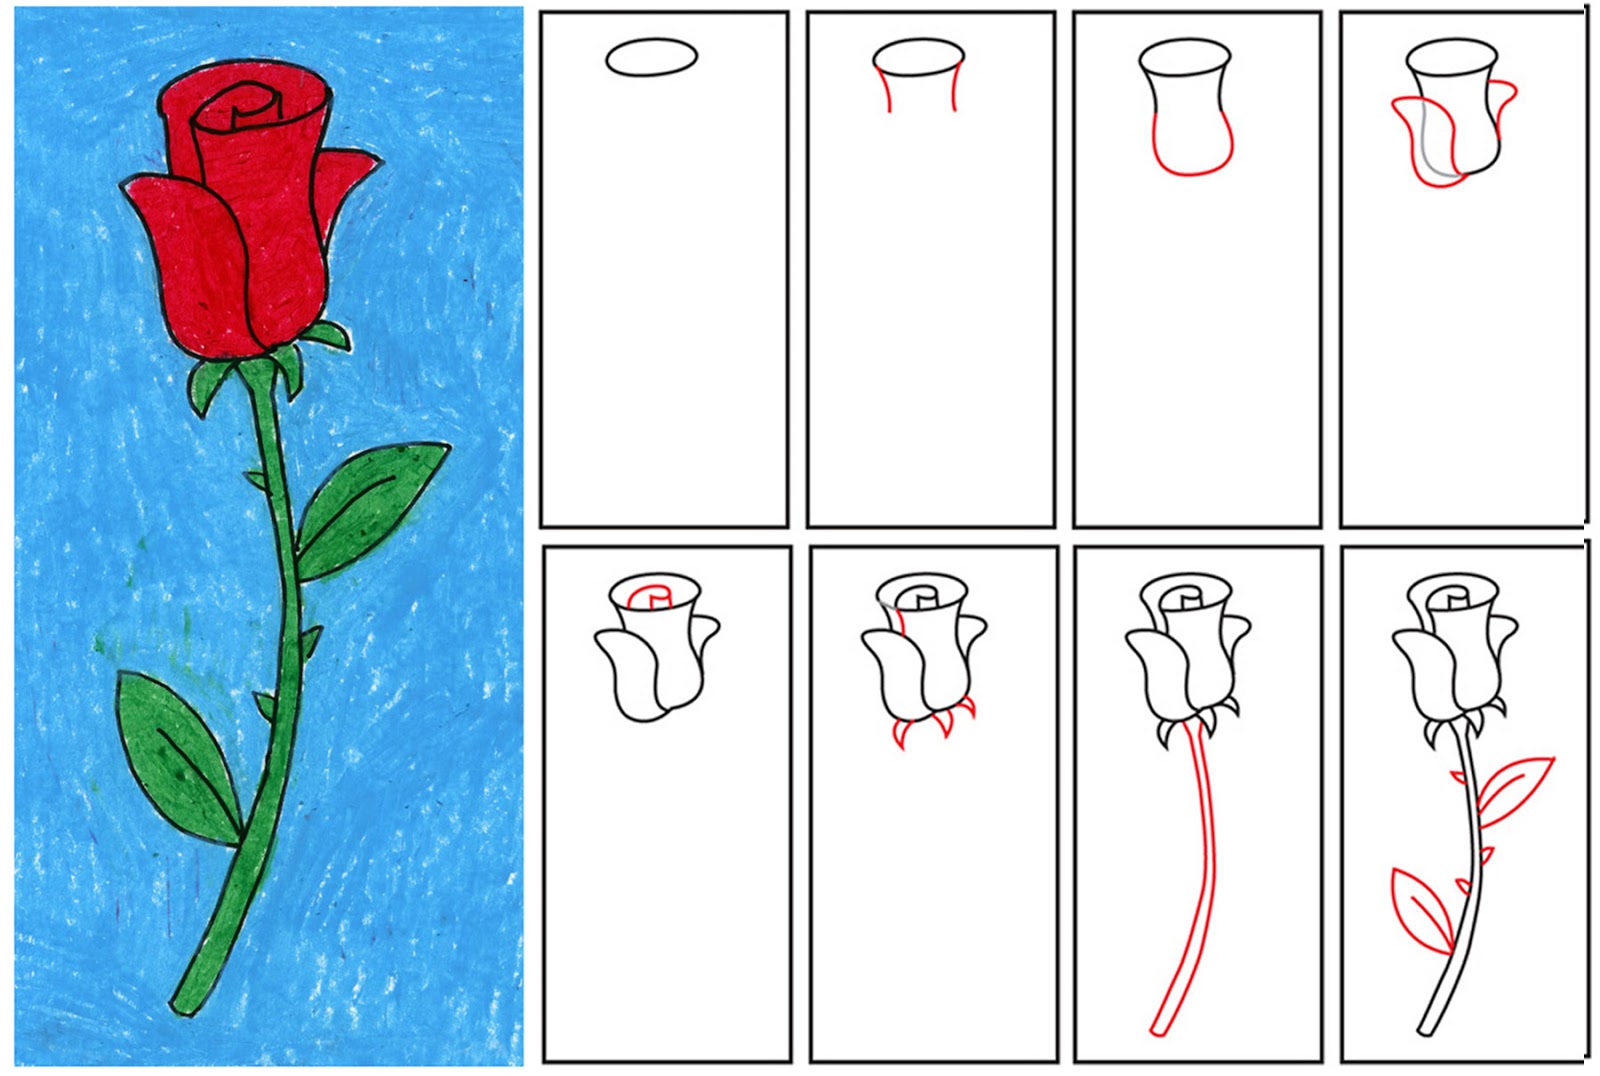
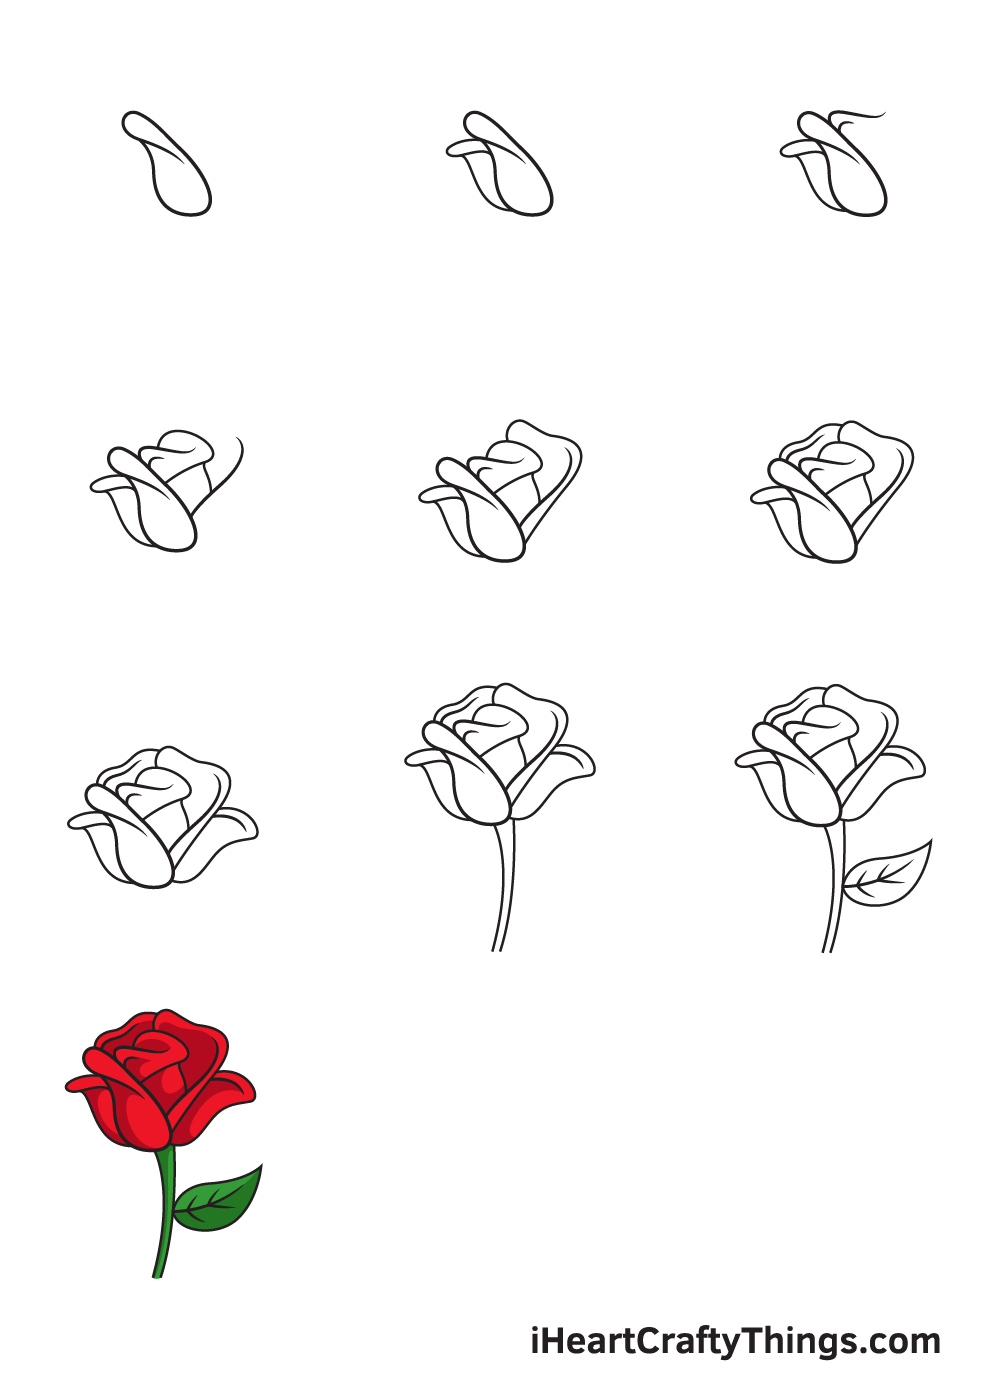
Step 1: Start with a Simple Circle
Now that you’re familiar with the structure of a rose, let’s begin! The first step in learning how to draw a rose easy is to create a basic shape. Follow these steps:
Creating the Center of the Rose
- Lightly sketch a small circle in the center of your paper. This will serve as the base for your rose.
- Add a small oval inside the circle to represent the bud. Think of it as the heart of the flower.
Remember, these initial shapes don’t have to be perfect. They’re just guidelines to help you build the rest of the rose. Keep your pencil strokes light so you can erase them later if needed.
Step 2: Add the First Layer of Petals
With the center established, it’s time to add the first layer of petals. This is where the rose starts to take shape:
Building the Petal Layers
- Draw three curved lines extending from the circle. These will form the outer edges of the petals.
- Connect the lines to create teardrop-shaped petals. Make sure they overlap slightly to give the illusion of depth.
Don’t worry if the petals aren’t perfectly symmetrical. In fact, slight imperfections will make your rose look more natural. Roses in nature aren’t perfectly uniform, so embrace the organic flow.
Step 3: Layer More Petals
Once the first layer is complete, it’s time to add more petals. This step is crucial for creating a full and lush rose:
Adding Depth to Your Rose
- Sketch additional petals around the initial layer. Vary their size and position to create a dynamic look.
- Overlap the petals to mimic the natural growth pattern of a rose. Some petals should be partially hidden behind others.
As you draw each petal, pay attention to its shape. Some petals may curl inward, while others may fan outward. This variation adds realism to your drawing.
Step 4: Draw the Stem and Leaves
Now that the flower is taking shape, let’s move on to the stem and leaves. These elements complete the overall composition:
Completing the Rose
- Extend two parallel lines downward from the base of the rose to form the stem. Add a few small thorns along the sides for detail.
- Sketch three or five leaves branching off the stem. Use a zigzag pattern to create the serrated edges.
The stem and leaves may seem simple, but they play an important role in balancing the composition. Take your time to ensure they look proportional to the flower.
Step 5: Refine Your Drawing
At this point, your rose should be coming together nicely. Now it’s time to refine the details:
Perfecting Your Rose
- Erase any unnecessary guidelines, leaving only the final outlines.
- Add shading to give your rose depth and dimension. Focus on areas where the petals overlap or curve inward.
Shading is what brings a drawing to life. Use light, gentle strokes to create shadows and highlights. This step may take some practice, but it’s worth the effort.
Tips for Improving Your Rose Drawing Skills
Learning how to draw a rose easy is just the beginning. To become a better artist, here are some tips to keep in mind:
- Practice regularly: The more you draw, the better you’ll get. Set aside time each day to practice different techniques.
- Study real-life references: Observing actual roses will help you understand their structure and movement.
- Experiment with colors: Once you’re comfortable with pencil drawings, try adding color to your roses. Experiment with different hues to capture their vibrancy.
Remember, art is a journey. There’s no such thing as perfection, only progress. Celebrate every step of the way!
Common Mistakes to Avoid
As with any new skill, there are common pitfalls to watch out for when learning how to draw a rose easy. Here are a few to avoid:
- Overcomplicating the process: Start with simple shapes and build from there. Don’t try to create a masterpiece on your first attempt.
- Ignoring proportions: Make sure all the elements of your rose are in proportion to each other. A stem that’s too long or petals that are too small can throw off the balance.
- Skipping the details: While it’s tempting to rush through the process, taking the time to add details like shading and texture will elevate your drawing.
By being aware of these mistakes, you can avoid them and focus on improving your skills.
Inspiration from Famous Artists
If you need extra motivation, take a look at how famous artists have depicted roses throughout history. From Monet’s impressionist paintings to Van Gogh’s vibrant still lifes, roses have inspired countless masterpieces. Studying their work can provide valuable insights into composition, color, and technique.
Conclusion
Learning how to draw a rose easy doesn’t have to be difficult. By breaking the process down into manageable steps and practicing regularly, you can create stunning rose drawings in no time. Remember to focus on the basics, pay attention to details, and most importantly, have fun!
So what are you waiting for? Grab your pencil and start drawing! Share your creations with friends and family, or post them online to inspire others. And don’t forget to check out our other articles for more artistic tips and tricks.
Happy drawing, and let your creativity bloom!
Table of Contents
- Why Learn How to Draw a Rose Easy?
- Basic Materials You’ll Need
- Tools for Easy Rose Drawing
- Understanding the Structure of a Rose
- Step 1: Start with a Simple Circle
- Creating the Center of the Rose
- Step 2: Add the First Layer of Petals
- Building the Petal Layers
- Step 3: Layer More Petals
- Adding Depth to Your Rose
- Step 4: Draw the Stem and Leaves
- Completing the Rose
- Step 5: Refine Your Drawing
- Perfecting Your Rose
- Tips for Improving Your Rose Drawing Skills
- Common Mistakes to Avoid
- Inspiration from Famous Artists
- Conclusion